Disclaimer: I am not a doctor, nutritionist or professional chef. I do not provide nutritional breakdowns or carb counts with my recipes. Google is a great source for that if needed. Blessed be... and happy cooking!
Showing posts with label Sides. Show all posts

Thursday, December 7, 2023

Holiday Brussels Sprouts & Cranberries

 This recipe is adapted from the ADA's Diabetic Food Hub.

Think you don’t like Brussels sprouts? Keep an open mind and try this recipe. Roasting veggies brings out maximum flavor and the mix of balsamic and cranberries is delicious. Unfortunately, roasting this vegetable brings the glycemic index up quite a bit so portion control is important. 

Boiled sprouts GI is around 32, but roasting brings the GI into the high range at about 75. Sticking to a portion of 1/2 - 3/4 cup of this delicious side will retain a GL in the very low range. Enjoy!

Ingredients:

  • olive oil cooking spray
  • 1 lb fresh Brussels sprouts - trimmed and cut in half
  • 2 tbsp olive oil
  • 2 tbsp Balsamic vinegar - get creative... I used a white lemon Balsamic to pair with the Lemon Pepper Halibut
  • 1/3 cup dried cranberries - get the ones with least sugar.
  • 1/8 tsp table salt - maybe more to taste
  • 1/4 tsp black pepper
Preparation:
Place cranberries in a small bowl and just barely cover with water.
Let soak for 1 hour and drain.

Preheat oven to 400 degrees when cranberries are ready.

Spray a baking sheet with cooking spray.

In a medium bowl, add remaining ingredients and mix well.

Pour Brussels sprouts mix on baking sheet and spread to a single layer.

Bake for 25-30 minutes, tossing once around the 15 min mark during baking.

Serves best with loin of pork or turkey or even a nice halibut as shown here.

Blessed be... and happy cooking!

Monday, November 13, 2023

Low-Carb Cauliflower Mash

Boiled potatoes, with their glycemic index around 80, are simply not a good choice for diabetics. Everybody loves a good pile of mashed potatoes, though... especially when slathered with a good gravy. I found this cauliflower mash on the ADA's Diabetic Food Hub and have to say... it works. It will never replace the awesomeness of the mashed potatoes I still make for everyone else on holidays, but hey... I'm a diabetic and have to do what's right for me. 

I've adapted this one with a bit more cheese and salt for more flavor. Enjoy!

Ingredients:

  • 1 large head cauliflower
  • 1 tbsp salted butter
  • 1/2 cup sharp white cheddar cheese - grated 
  • 1/4 tsp salt
  • 1/8 tsp black pepper
  • 2 tbsp fresh chives or scallions - chopped

Preparation:

Cut the cauliflower into florets (discard the thick stem). Insert a steamer basket in a large pot and fill the pot with water up until the level of the steamer basket. Add the cauliflower florets. Cover the pot and steam over high heat for 12-15 minutes or until the cauliflower is softened.

Drain the cauliflower and add it to a large bowl. Use a fork or potato masher to mash the cauliflower. Stir in the butter and cheese while the cauliflower is still hot. Add the salt and pepper and stir until the mixture is mostly smooth and creamy. (Chef Michael Note: If you want your mash really smooth, finish the mix with a stick blender.) Serve and top with chives or scallions.

Blessed be... and happy cooking!


Friday, October 20, 2023

Garlic Sprouts with Turkey Bacon & Shallots

I adore Brussels sprouts and their versatility. I decided on a trial run of some new ingredients that were kicking around the fridge and needed to get used. So here you have it:

Total prep time is 15 minutes, so it's a really quick hot and very healthy lunch... (the turkey bacon is 90+% fat free) Or if you're on the go, make it in the morning and pack it - it's really good cold as well.
Ingredients:
  • 1  10 oz pkg frozen Brussels sprouts (fresh are also good)
  • 1 small shallot
  • 1 clove garlic
  • 2 strips turkey bacon
  • Salt to taste
  • 1 tbsp olive oil
Preparation:
Cook the Brussels sprouts in water until almost tender. Keep them firm as they will be going in the skillet later. Mince the shallot and garlic and cut the turkey bacon into small pieces. Sautee these items in the olive oil until the bacon is nicely browned. Add a dash of salt if needed.

When the sprouts are done, drain and then cut them in half. Add to the pan and mix while sauteeing for a few more minutes until the sprouts are partially browned.

Serve as is or with a touch of parmesan.

Blessed be... and happy cooking!

Monday, October 16, 2023

Hot Bacon Kale

Ready for a green treat? Well then..... Have I got a treat for YOU!!!
I discovered kale.
There... I said it. I really didn't know kale existed until I was in my mid-fifties. LOL
I have to tell you... I'm kind of ticked off that nobody ever introduced me to
this great leafy green wonder before, but hey... can't win them all, right?
My introduction to kale was by way of this recipe, and let me tell you... it was baptism by fire, because this side is just insanely good! Now granted, it has bacon, and I am the first to admit that just about ANYTHING with bacon is amazing... There are more flavor levels to this dish than just the bacon, though, that make it so great. Here.... check it out...

Ingredients:
  • 4 slices bacon, chopped - turkey bacon is what I use these days.
  • 1 bunch fresh kale, about 10 oz, de-stemmed and shredded
  • 2 tbsp real sherry (not the grocery store crap)
  • 2 tsp Dijon mustard
  • 2 tbsp water
Preparation:
Mix sherry, mustard and water together in a measuring cup and set aside.
Place the bacon in a cold large stock pot over medium heat.
(cold pot promotes an even cook on the bacon)
Cook 3-4 minutes, until the bacon browns.

Cook's note here: I made a double batch in these pics and used turkey bacon.

 Add the kale and cook another 3-5 minutes, turning often, and pressing it down with a small lid or spatula until the kale reduces in size and is tender.

Turn the heat to low and add the sherry, mustard and water mix.
Toss until well blended and serve immediately.


Blessed be... and happy cooking!

Tuesday, September 5, 2023

Roasted Chickpeas & Pepitas

The original idea behind this side dish was to simply create a flavorful topping for my Spinach Salad. As happens very often in the kitchen, tasting new creations with one purpose will generate ideas for other uses of the original concept. That is exactly how this side dish, an original Chef Michael R creation, came to be.

After sampling what was to be a salad topping I found chopped portobello mushrooms dancing through my head... Yes... I can see flavors. LOL

The result (after a few trials and tweaks) is a rather earthy side that will pair well with just about any meat dish. ENJOY!

Ingredients:
  • 1/4 cup pepitas - raw pumpkin kernels
  • 1 cup canned chickpeas, drained
  • 1 cup+ baby portobello mushrooms - cut up
  • 2 tbsp olive oil
  • 1/4 tsp lemon pepper - My favorite is FreshJax Citrus Pepper
  • 1/8 tsp table salt
  • 1 tbsp fresh parsley - chopped or minced
Preparation:
Rinse and drain the chickpeas and set them aside to dry. Place the pepitas in a medium size skillet with medium heat. Toss frequently until they're a nice golden brown and set aside in a cold bowl.
Place chickpeas in the same skillet and brown them as well. Add the pepitas back along with olive oil, salt and lemon pepper. Toss to blend all components well.
Add the mushrooms and cook until done, tossing frequently. Cover 30 seconds or so between tossing so steam will cook mushrooms quicker. Finally add the parsley and blend well.

Serve with something savory like these Parmesan Panko Chicken Tenders. 
Blessed be... and happy cooking!

Monday, August 28, 2023

Tomato-Pepper-Basil Chutney

A while back we had dinner over at cousin Paul's house. He and Susie were in the middle of a 3-week diet called New You in 22 - The Metabolic Meals Blueprint by Jonny Bowden, Phd, CNS. What they served was simple BBQ chicken thighs that were elevated to OMG status with a chilled chutney made from tomatoes, peppers and basil. Really easy to make, this stuff packs a punch of fresh that caused the Reilly's to make yummy noises. Carolyn and I both thought it might be equally exciting with some Wild Alaskan Company cod, so we tried it.... 
In a nutshell... a new family favorite was born...
Ingredients:
  • 4 ripe tomatoes, quartered
  • 2 large red bell peppers, seeded and cut up
  • 1 cup sundried tomatoes in oil, well drained
  • Two handfuls fresh basil (I used lemon basil with the fish)
  • 2-3 cloves garlic, crushed
  • 2 tsp dried oregano
  • 1/2 tsp each salt and fresh ground black pepper
  • 6 tbsp coconut oil, melted

Preparation:
Just so you know, the above ingredient list is a double batch because I loved it THAT MUCH and knew I'd find varied uses for it during the week ;-) I also used olive oil in lieu of coconut oil... well I just forgot to pick some up LOL Trust me... a good olive oil works equally well! 

First, get out your food processor. Cut up the tomatoes and peppers and crush the garlic.
Measure out a cup of sundried tomatoes and drain for a few minutes in a colander.
Add all ingredients to the food processor a little at a time. You'll notice there are no pics of the basil... That's because I used frozen lemon basil from last year's garden and...well... it just didn't live up to my photo standards...... ahem ;-) Pulse a few times to break up the larger pieces, then process steadily, until the mixture forms a "sauce" that is mostly smooth. 
If the mixture is too thick, add a little more oil, but make sure it doesn't get runny. You want the chutney to be able to stand alone as seen here with the baked cod and steamed string beans.
Like I said, the chutney was originally recommended with chicken. The fish worked really well, and I bet it will compliment the other white meat nicely as well! It's just an amazing little blend that I'm sure will prove quite versatile in the future... ENJOY!

Blessed be... and happy cooking!

Friday, August 11, 2023

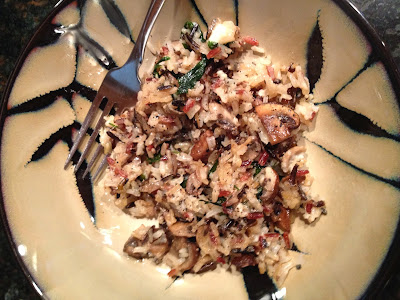
Terroso Riso aka Earthy Rice... or Barley!

You know it's not always about the main course. Sometimes a side dish
can really pull things together.... like this very earthy rice favorite. 
Yes.... this has whole grain rice, a complex carb,
so be sure to serve a sensible portion as a side :-)
A healthier option for this dish is to use barley... leftover, pearl or quick-cook.
Same great flavor pallet with a GI of 35. Enjoy!
I will leave the measurements/quantities up to you.
Have fun with it and make it your own. :-)
Ingredients:
· Whole Grain Wild Rice - pick your favorite
· Olive Oil
· Baby Portobello Mushrooms - chopped
· Fresh Italian Parsley - whole leaves, no stems
· Garlic Powder
· Locatelli Romano Grated Cheese
· Fresh Ground Black Pepper

Preparation:
Cook rice according to directions... You can use leftovers here, too. In a non-stick pan, fry the rice and mushrooms in a bit of olive oil... Just enough for frying... don't drown the rice. Add garlic powder and parsley and toss over low flame. Fold in grated cheese until melted. Serve with fresh ground black pepper.


Blessed be... and happy cooking!

Wednesday, May 10, 2023

Lima Bean Medley


One of my rainy day experiments turned out to be a very nutritious dish with fair amount of protein, anti-oxidants and other stuff that’s good for you. ðŸ˜Š Use stand-alone or as a side or even as a snack. A half recipe is plenty for two people as a side dish with some left over.

Ingredients:

·       16 oz frozen baby lima beans

·       10 oz baby portobello mushrooms - sliced

·       2 lge yellow onions – cut up to your liking

·       2 tbsp olive oil

·       Salt & pepper to taste


Preparation:

Cook the lima beans per pkg instructions and set aside.

In a non-stick Dutch oven , or large skillet, saute the onions over medium heat until just translucent.

Add the mushrooms and continue to cook until mushrooms are soft.

Add cooked lima beans and season with salt & pepper. Give it all a good toss and serve.

Lima Bean Medley paired with BBQ chicken and German Cucumber Salad

Blessed be... and happy cooking!